
Welcome to my blog! Read about photography, film photography in 35mm, medium, and large formats, pinhole photography, about darkroom printing, alternative photographic processes, and more. Thank you for visiting!
Elements Getting in the Way?

 Is it raining, and cold, and all the other things you could call nasty? Do you not feel like heading out of the warm house and leaving the comfortable couch? Yes, I've been there several times just over the last few weeks with the winter as it's been. But it is wrong! It can mean getting out of your comfort zone but it can be so worth it! Each weather pattern simply gives completely unique opportunities. When it rains, you can do things you cannot do when it is sunny. When there's a whiteout, everything will look differently than on a blue sky day.
Yesterday, I saw a beautiful landscape photo in the rain, a long exposure where the rain drops created an interesting texture on the water surface.
And that got me out! I loved that photo and it was taken in the rain. I could not get out before dark, I had no pretty landscape in mind or planned for a rainy day. But when I put my excuses aside I had fun despite the rain and got some new photos for my collection that I would not have without the 'nasty' in the air or on the ground! :-)
Have fun!
The Not So Perfect Automatic Exposure
 I actually wanted to post something about using flash today but realized the point had so much in common with a flash-free exposure that I decided to take it step by step. So bear with me please, I will get there.
Sometimes, even today's great cameras with their 'smart' evaluative metering just don't do what we want them to, whether in full automatic, aperture priority, or shutter priority. Most articles I see recommend using exposure compensation in these situations. While usable, it is often unpredictable and either results in you checking the exposure almost after every shot and adjusting and reshooting, or some shots end up under or overexposed.
What is going on here? Say you are photographing a skier. With the white snowy background, you throw in say +1.7 EV exposure compensation and start shooting. When you download the photos to the computer in the evening you notice that all of the wider angle shots with large areas of snow and a small figure of the skier are perfect while the ones where the skier got closer or you zoomed in have the skier overexposed. As you change your composition and either include more or less of expansive white area, the automatic exposure is either more or less accurate. And then you add a fixed +1.7 EV on top of that! So with the skier filling the frame, you would really need +0.3 EV or +0.7 EV, while more snow requires +1.7 EV or even +2.0 EV.
The same scenario can happen while photographing birds in flight. As you pan with them, your background can change from blue sky, to green trees, to bare trees, or something even more dramatically different. As the background brightness changes, the camera adjusts its exposure even though you may still be photographing the same bird in the same light.
In these situations, I find the manual mode so much more predictable to use. When you switch to manual, the meter is still active and you will see the reading in the viewfinder. Establish the right exposure for your subject and leave it. Now unless the light changes your skier, or your bird, will remain properly exposed no matter what happens to the background and you can keep shooting knowing your results are going to be more consistent! To be on the safe side, you can still check your exposure once in a while especially if you suspect the light changed enough, like the sun going behind a cloud or emerging.
The same applies to product photography. Many times, you may need to photograph the same object against a variety of backgrounds. With the automatic modes, you will be stuck constantly adjusting your exposure compensation. If you go with the manual mode, you measure your light once and then you just keep shooting!
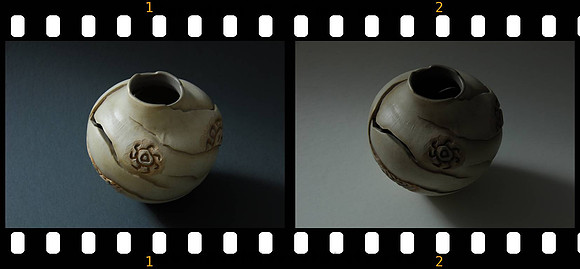
In the example above, I set the camera to evaluative metering and aperture priority mode at f/8. While I was photographing the same vase and the right exposure should really remain the same, you can see it did not. With the black background, the camera tried to brighten it up and bring the scene average closer to 18% gray, choosing 4.5-second exposure (yes, it was pretty dark since I did not bother setting any lights up). Then all I did was swap the background for white. Now the camera tried to do the opposite and darken the overall image towards an 18% gray, resulting in a 1.5 second exposure.
Where was the right exposure? Somewhere in between. If I chose an 18% gray background my exposure would have been the closest. And for product photography that is just what I like to use to get my exposure right - an 18% gray card. It will serve you two purposes. You can set your manual exposure off of it and you can also set your custom white balance off of it. Go get one if you don't have one yet.
Have fun!
Western New York - When Winter Happens!
 This 2011/12 winter season has been less then impressive here in Western New York. Every time we get the pretty white coat that cleans everything up and makes it photogenic, a warm up comes accompanied with rain and ruins it again, and again, and again. That is what prompted my idea to put a little eBook together that would show how winter in Western New York is supposed to look.
You can download it here (it's free). I'd appreciate comments and you can leave those in My Guestbook (Contact > Guestbook from the home page).
Have fun!
Close, closer, even closer! Extreme macro close up.
 Winter offers a great opportunity for landscapes that look completely different from their summer counterparts. You could re-shoot all of your Spring - Fall locations in WInter and no one might notice it's the same places - maybe I have to try that one day!
Winter is also a great time to stay indoors and try out new things in the home studio. In particular macro photography can be so much fun. And the thing is, you don't really need a dedicated macro lens to get started. There are cheaper solutions like extension tubes that allow for great results and are way cheaper than a dedicated macro lens. For example this Kenko Extension Tube Set (this one is for Nikon, search for other brand compatibility as needed) will allow you to get as close as needed because they are stackable permitting you to get so close that lighting will be a problem. One thing about extension tubes that you need to keep in mind is that the lens will no longer focus to infinity like a true macro lens would. Not only infinity - you will be able to focus only within a really limited range. When you stack all of them, your focusing range may be about an inch, if that. But that's the purpose, getting close, right?
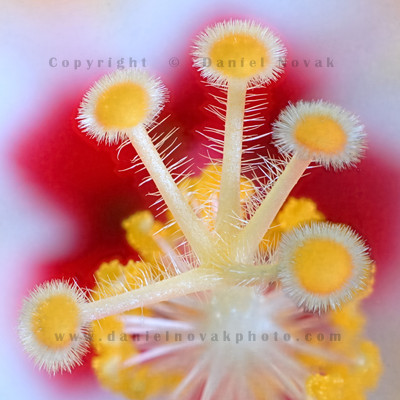
In this photograph, I used the above listed Kenko tubes to get extremely close to a hibiscus bloom. If you've seen a hibiscus bloom before you know how small the stigma pads are in real life.
Working in these high magnifications, getting the focus right is a bit different too. I like to place my camera on a tripod close enough to the subject to insure it can be focused on, and then I combine manual focusing and moving the subject back and forth to get just the right spot in focus. Forget auto-focus. If you are going to get more into this field, a focusing rail might be a good investment but then a macro lens probably would be too. So for a cheaper solution, moving the subject must do.
When you do get this close, depth of field is going to become a problem and a simple small aperture, even an f/22, may not be sufficient. You may need to reach for software solutions like Helicon Focus or similar.
Have fun!
Winter found its way!
 January 13, 2012 and Buffalo got its snow. No, it's not the first snow of the season, but probably the first real snow that will stay around for more than a day or two. It's definitely the latest start I remember. And it was about time. My intuition has been plotting winter plans for quite a while and there was nowhere to execute them. The surrounding grayness has been rather uninspiring. We've got the white now!
Now that the landscape has turned white, don't forget to set your camera right. Don't let the full auto mode turn all of your photos gray. Snow looks good white, not gray. If you use a point and shoot, find the snow mode and use it, your snow should look much better. If you use a camera without a snow / winter mode, go with exposure compensation or manual mode. Most places will recommend exposure compensation but I find it tricky to use since it's difficult to guess whether to go for +0.7, or up to +1.7. Yes, with experience, you can guess based on how much white area is in your frame but any time you zoom in or out or change your composition, you may need to change your compensation level.
The manual mode may be your best bet. If you want to keep things simple and don't have a gray card around, start with an aperture and shutter speed that will indicate about +1.0, take a test shot, check the histogram and the photo on your LCD, and adjust as needed. Once the photo looks good and your histogram is mostly on the right, but not chopped off, leave it and you're set. Unless the ambient light changes you should not need to change your exposure.
If you have a gray card, set your exposure off of it and you're set.
Have fun!