
Welcome to my blog! Read about photography, film photography in 35mm, medium, and large formats, pinhole photography, about darkroom printing, alternative photographic processes, and more. Thank you for visiting!
Buffalo's Waterfront's Rising!
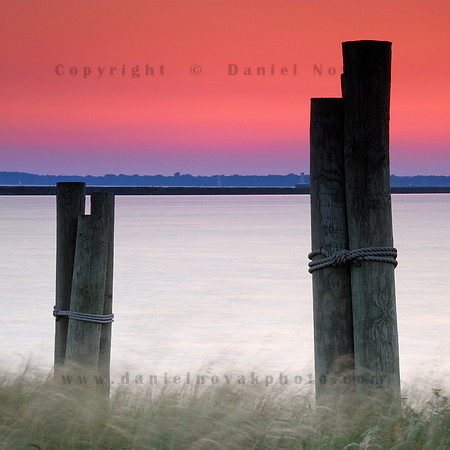
The waterfront here in Buffalo, NY, has seen some dramatic improvements over the last few years. The unused industrial land is now being used for public projects and to give people access to this prime waterfront location. There have been so many improvements done that it is hard to believe it has happened so fast. It is happening so fast that a lot of people living here have no clue.
This photo was taken by the Bell Slip, one of many great spots along the Greenway Nature Trail just off of Fuhrmann Boulevard.
It's a great location to watch the motor boats and sailboats go by on both sides of the break wall and slowly disappear with the setting sun. Just pack it up soon enough before the June Bugs attack - but more on that rather funny topic at a later time.
As far as the gadgetry goes, this was through two Cokin Graduated ND filters, one over the top down to the horizon (ND8) and the second all the way down over the water (ND4), to let the grass come alive despite being heavily shaded. The whole Cokin rig (P holder) was on top of my B+W 6-stop ND filter.
Enjoy wherever you are and have fun!
Creative White Balance - Fluorescent - An Emotional Scene Copy

 White balance. We spend so much time worrying about getting it right, about making things look natural. We use white balance presets in the cameras, sometimes even set the Kelvin temperature manually using a grey card. Or we include something neutral in one of the shots to properly balance the photos later on the computer. Or we photograph using RAW. That way, no matter what was selected in the camera our software can easily change that and re-render the scene.
Other times, we intentionally shift the white balance to warm up the scene. Warm colors are popular, eye catching. So even in direct sunlight we may chose to set the camera to cloudy, or even shade.
But did you ever think of just going wild with your white balance and selecting something completely unintuitive, counterintuitive, just plain crazy?
In these photos, you can see how that can change the mood in the photo. Change in an unexpected way. Change in a way that you may, or may not like. But how do you know if you don't try?
The first photo is with the Camera Automatic white balance setting. Not exactly what it looked like to me on that beautiful foggy morning but fairly close, with some of the bluish cast removed.
 The second photo shows the subtle difference I got using automatically calculated white balance in Nikon Capture NX2. Just a tad more neutral. Subtle but different.
I still like both of these images. They do express the simplicity of the foggy morning when all of my compositions were very simple. The fog took care of that. No distracting backgrounds, just my subjects. However, there was something even more special about that morning, something that kept me there for hours!
How about changing the rules and instead of trying to capture a visual copy of the three rocks going for an emotional copy?
Take a look at the final image below. For that one, I selected Standard Fluorescent White Balance. It had nothing to do with the scene. Neither Mother Nature nor I brought any mercury-filled bulbs to the scene.
Is the mood in the photo different? I definitely think so. And I believe it better communicates what it felt like during the unseen sunrise hours with fog consuming everything around me. I think there's no reason to always follow the perfect factual visual replica. An emotional copy may just work!

Three Rocks, Water, and Fog - A Foggy Sunrise on Lake Erie
Have fun balancing!
The American Landscape 2012 - Outdoor Photographer's Annual Photo Contest Winners
You can see more ongoing contests in my previous post on photo contests as of June 2012. The American Landscape Photo Contest now has winners posted. Outstanding photographs in my opinion. Go check them out and comment on what you think. You can also vote on the People's Choice out of the finalists through the end of July.
Have fun!
Brewing Storm over Gallagher Beach, Buffalo Waterfront
Two storm fronts passed over the lake and over Buffalo today. The first one cancelled my planned bike ride, the second one worked its way into my lakefront expedition. A friend of mine told me I lacked day time photos and he was right. We don't live only during the two magic hours, do we? So here's one shot from noon.

How to Create a Time Lapse Sequence in iMovie
My first attempt at making a time-lapse video out of a sequence of photos was not too successful. I just could not make it go fast enough. After some poking around I found out there is a way though and would like to summarize it here for you.
I am not going to go into the photo prep detail at this point. I will just assume you have a folder full of preprocessed photos sized just right for your video. In my case, I was after an HD video thus batch sized all of my photos down to 1920x1080 to make a 1090p video. Just a quick note on that step, I'd recommend avoiding any sharpening that you may normally do, on top of the hopefully slow shutter you used to capture your photos. That will make your frame to frame transitions smoother.
Start by creating a new iMovie Project. I named mine "Birdsong Time Lapse", picked Widescreen 16:9 for aspect ratio, 30 fps - NTSC for frame rate. At the bottom, uncheck any automatic transitions. Click Create. There are multiple ways to get your photos into your project now based on your workflow. Here, I simply dragged and dropped them from Finder right into the project. Then you can Command-A select all of them and click the 'i' icon to open the Inspector. There, you can set the duration of each photo. To get the duration approximately in line with the selected 30 fps frame rate, I needed to enter 0.03 seconds. But what is it? iMovie won't let you go under 0.1s!
I really don't know if there's any technical reason for this but I doubt it. I think it is just their marketing trick to get you pay for full Quick Time, which is what all of the Apple pages I came across stated. Not so fast though!
The first change you can, but don't have to do is to change the display format of time information. Go to iMovie > Preferences and on the General Tab check Display time as HH:MM:SS:frames. Now, in theory, you should be able to say that each photo should last 1 frame and you'd be all set. Just be careful not to get confused. The frames are still separated by a colon, not a period or other mark, and thus you don't have a reminder of this format and the last number will always be frames.
Close the preferences and back to Inspector. Enter "0:01" and tab out. Look, it's changed to "0:05"! So again, Apple is preventing speed fast enough for a time lapse sequence. But I like this format anyway, it makes the next step feel more exact. Proceed with the "0:05" duration and go to Share > Export Movie. I picked the last option, HD 1080p.
Now, go back to Project Inspector and create a second project, all properties the same as the first. I named it "Birdsong Time Lapse 5x" this time. This time, the ".mov" file that was created in previous step can't be dragged and dropped. Go to File > Import > Movies. Select the video file from the previous step, pick an Event to place the video into, select Optimize VIdeo / Full - Original Size, and Copy Files. Now you can select the whole clip in the Event Browser and drag and drop to your Project. Hit Command-A to make sure the whole clip is selected in the Project Browser.
Now, open the Inspector again, select the Clip Tab. Now there is a speed option that you can set to 500%, thus getting from each photo lasting 5 frames down to 1. If the speed option is not active, you probably did not select the optimize option upon import. In that case, you will see Convert Entire Clip button next to speed. This will do the optimization after the fact.
And that's it! Just export your movie one more time and you've got yourself a time lapse out of iMovie without paying to Quick Time or other additional software. If you have other reasons to buy that additional SW, by all means, go for it. But if it is just due to the duration limitation of iMovie, this just might save you a fe bucks.
Have fun lapsing time!