
- Home
- | Galleries ▼
- | Collections ▼
- | About ▼
- | Blog
- | Zines
- | Login
Indoor Photo Project - Water Gone Wild, Vividly and Colorfully Wild

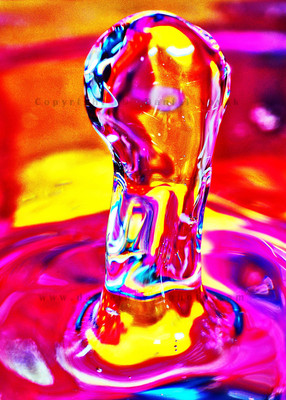 Water Gone Vividly Wild
 I've seen these on various photo sharing sites, blogs, and other internet places. However, I've never tried to get one of my own, that is until now. Somehow, Bryan Peterson's video finally pushed me over to get the set up ready and do it! On that topic, you can sign up for Bryan's newsletter with lots of creative ideas at the PPSOP (look for a link at the bottom). He now also works with Adorama and the tips are also featured there.
I've pretty much followed what you can see in the video. I have not used a macro lens but rather a 50 mm prime on a 24 mm Kenko extension tube. I also changed my lighting set up. Instead of two flash units from the front left and right I used cross lighting with one from front right and one from back left. I was not sure how it would work with water but under other circumstances I like how the backlight creates a nice rim light around the subject. Here, I was hoping it would highlight the transparent quality of the water droplet.
I also tried both flashes from the back, but that did not provide enough light on the background and the colors were too dark and without saturation, so I moved the right flash back to the front.
I did not use two bowls, one on top of another. I used only one and filled it up almost to the top. That way, the background was nicely clear. Initially, I was tempted to try to go for a low angle, almost horizontal, but the visible water line bothered me so I raised the camera to shoot through the water and the bowl's bottom.
Both the camera and my flashes were set to manual. I went for 1/250th of a second for shutter speed to kill the ambient light and to allow me handheld shooting. I varied my aperture between f/5.6 and f/11 trying to get as much of the water bounce in focus while keeping the background out of focus, which was not that easy since it was only about 3 inches behind the action. The flashes were fired wirelessly using the Nikon lighting system both in manual varying between 1/16 and 1/64 power. In this photo the front right was at 1/16 and the left back was at 1/32. Both were my SB-600s zoomed fully out to 85 mm.
Oh, and as far as processing goes, I did not use my normal SW. Instead, this was processed in VIveza 2, now from the Nik Collection by Google.
Have fun with your indoor photo project!
- Nikon D200 (my D600 is still with Nikon for cleaning)
- Nikkor 50mm f/1.8 (or the newer AF-S version)
- Kenko extension tube set
- 2 x SB-600 (now replaced with Nikon SB-700)
- Colorful fleece
- Glass bowl, sink, and dipping water
Using my links to buy your equipment keeps me going and costs you nothing. You can also use the Amazon search box in bottom left for anything not mentioned here. Thank you!
My previous Indoor Projects: